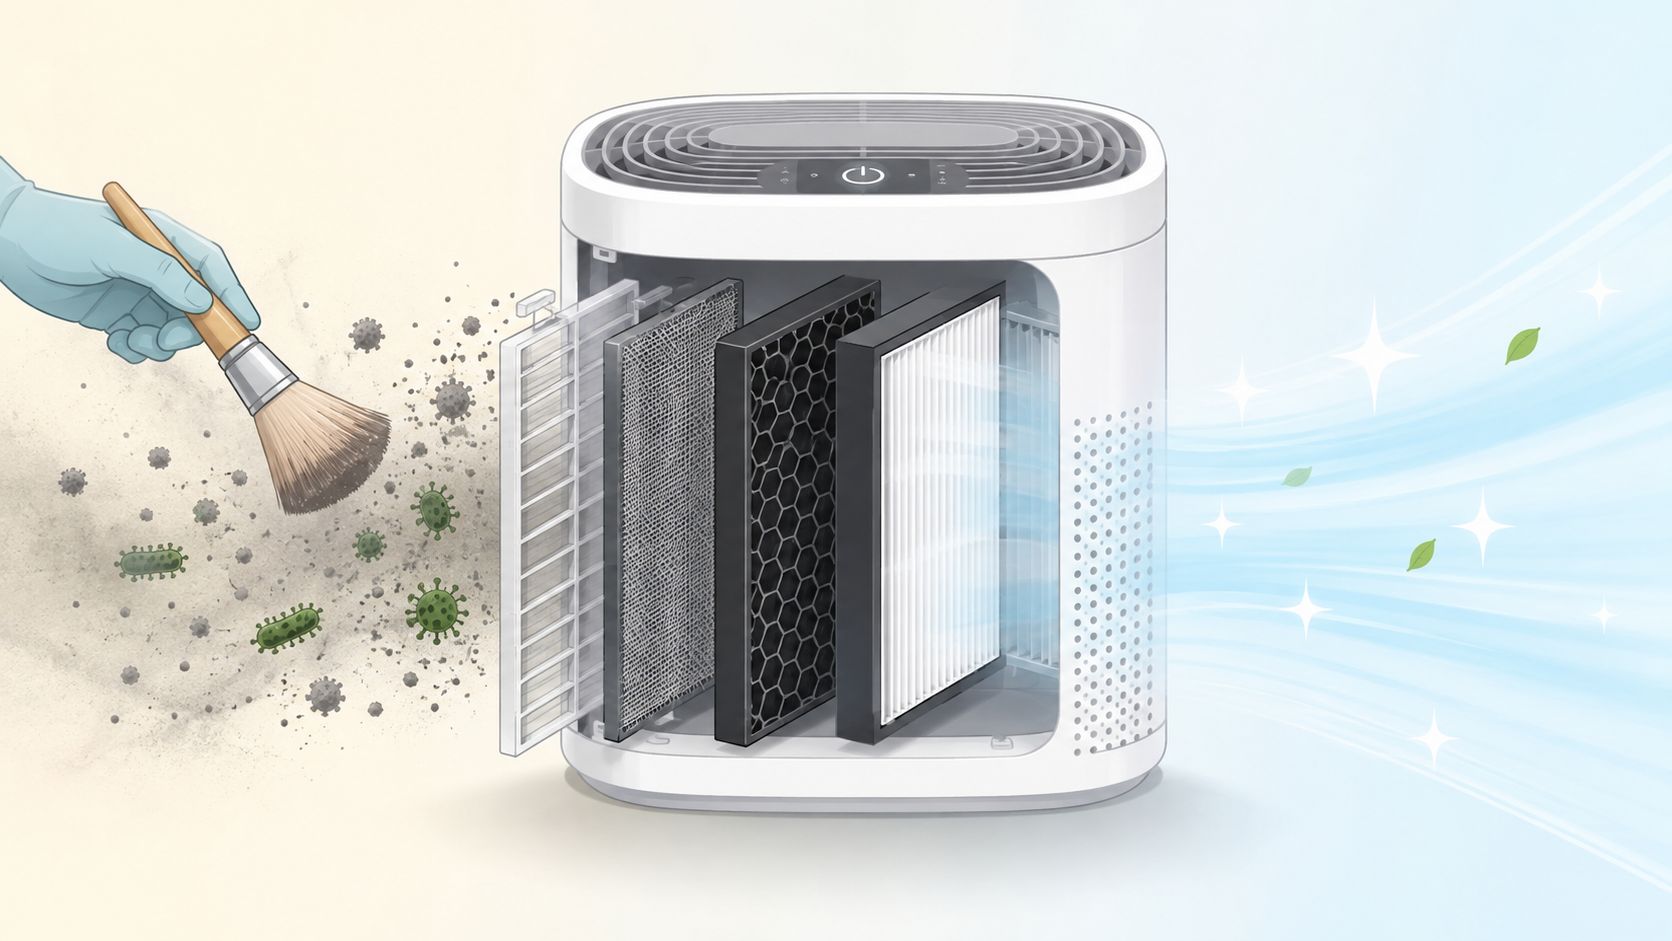
You're probably standing in front of the purifier right now, staring at a filter that looks more gray than white and wondering whether a quick vacuum is enough. If the unit spent a smoky week in a bedroom, a daycare room, or a gym office, that filter has been catching more than dust. It has also been catching the kind of material that changes airflow, carries odor, and can turn a simple maintenance task into a hygiene decision.

Why Air Purifier Filters Deserve More Thought Than a Quick Vacuum
A filter that smells sour is telling you something important. In homes, schools, and clinics, I've seen the same pattern over and over, a purifier gets opened after a rough week, and the “dust problem” turns out to be a maintenance problem. Modern guidance treats pre-filters as the most frequently cleaned part, usually every 2 to 3 weeks or up to 1 to 3 months, while main HEPA-style filters are typically replaced rather than washed and commonly last 6 to 12 months in residential use, because dirty filters reduce efficiency enough that regular cleaning or replacement is needed for proper operation (Consumer Reports).
Handle the filter like contaminated material
Before touching the filter, unplug the unit, put on gloves, and if the filter is heavily loaded, use a respirator or at least a dust mask. Move the purifier outdoors or to a very well-ventilated spot, then lay it on a surface you can wipe down afterward. EPA-aligned guidance is clear that you should avoid shaking or banging the filter, since that can re-aerosolize trapped particles and push them back into the room (EPA guidance).
Practical rule: if a filter is visibly dirty, damp, torn, or sour-smelling, treat it as a replacement decision first, not a cleaning challenge.
That matters in places where people share air. A parent dealing with a child's illness, a school custodian working after a busy week, or a gym manager opening a purifier in the staff room all need the same mindset, the filter is not just a screen, it's a reservoir.
Inspect before you clean
A quick visual check changes the whole decision. Tears, water spots, dark discoloration, or a musty odor mean the filter may already be compromised. For a broader home setup, a home air purifier is only as useful as the filters and intake surfaces around it, so inspection has to come before the wipe-down.

Cleaning Pre-Filters and Washable Outer Layers
Start by unplugging the unit and moving it to a space where dust won't settle on bedding, prep counters, or shared desks. Put on gloves, and if the pre-filter looks heavily loaded, wear a respirator or dust mask so you're not breathing what the unit collected for the last few weeks. A soft brush and a vacuum brush attachment do most of the work here, because the pre-filter catches the largest debris before it reaches the main filter.
Use dry cleaning first
Remove the front grill, then vacuum the pre-filter gently with a brush attachment. If dust is packed into corners, use a soft brush or duster to lift it out instead of scrubbing harder. Victoria's Department of Education allows three pre-filter cleaning methods, dusting, vacuuming, or washing with water, but it also stresses that washable pre-filters must be fully dry before reinsertion, with air-drying away from direct sunlight and manual blotting first if needed (Victoria Department of Education).
If the manufacturer allows rinsing, use lukewarm water and a mild, unscented soap only on the washable outer layer. Then blot with an absorbent cloth and let it dry completely. In humid rooms, that can take a full day, and putting a damp pre-filter back in is a fast way to invite mold and bacterial growth.
Keep the wet-cleaning limited to the layer the manufacturer actually designed for it. For most units, that's the pre-filter, not the HEPA core.
A useful cadence is every 2 to 4 weeks in normal homes, with weekly attention in high-dust or pet-heavy spaces. For school, clinic, and gym settings, I'd tighten that up based on visible loading and how often the room is occupied. If you want a separate reference point for moisture-heavy components, the dehumidifier filter maintenance guide is useful because the drying logic is similar even though the appliance is different.
Don't wet the wrong layer
The main point is simple, clean the part designed to be cleaned, and leave everything else alone unless the manual says otherwise. Once the pre-filter is dry and seated properly, you've already removed the bulk of the problem without risking the media that does the fine filtration.

What to Do With HEPA and True-HEPA Filters
HEPA media is where people get into trouble, because it looks clean enough to reuse long after it has started losing performance. The rule is blunt, if the manufacturer does not explicitly label the filter as washable, don't wash it. The University of Washington's HEPA filter guidance says filters should be cleaned and replaced according to manufacturer instructions, with a general practice of vacuuming the filter and wiping the exterior with antibacterial wipes as often as every two weeks, and replacing filters every three to 12 months (University of Washington HEPA fact sheet).
Vacuuming can help a little, washing usually hurts
A light pass with a low-suction upholstery tool may recover a bit of airflow, especially if the surface has obvious hair or lint. But aggressive vacuuming can damage fragile media, and washing is worse. Independent review work summarized by Smart Air found vacuuming produced only a small average gain in relative CADR of about 10%, while washing reduced effectiveness by about 32% on average, which is why replacement stays the safer default (Smart Air review).
The practical distinction is worth keeping straight. True HEPA filters are generally replaced, while some HEPA-type or explicitly washable designs may allow rinse cleaning, but only if the manual says so and only after full drying. Consumer Reports also notes that replaceable filters are often vacuumed monthly between changes, permanent filters are taken outside and gently vacuumed every one to three months, and a good replacement rule of thumb is every 6 to 12 months (Consumer Reports video).
Read the label, then stop
If the surface is damaged, collapsed, or holding odor after a gentle clean, replacement is the right move. CHOICE's review of manuals for more than 60 purifiers found manufacturer advice ranging from 3 months to 2 years for HEPA or carbon filters, which shows why the label matters more than habit (CHOICE review noted in the brief).
Activated Carbon, UV-C Lamps, and Ionizer Plates
The rest of the purifier needs its own cleaning logic, because each stage reacts differently to moisture and residue. Activated carbon filters are for odors and gases, not wet scrubbing, so the safest approach is usually a gentle vacuum of any outer mesh and replacement on the manufacturer's schedule, often around the same maintenance rhythm as other replaceable stages. If the carbon layer is damp, warped, or still smells after a careful exterior clean, replace it rather than trying to rescue it.
UV-C lamps are simpler. Unplug the unit, wipe the lamp with a dry, lint-free cloth, and never use liquids on the bulb. If the indicator says the lamp has reached end-of-life, replace it, because weak UV output undermines whatever bacterial-control benefit the unit was designed to deliver.
Ionizer plates and collection grids can crust over, which slows performance. A dry brush or lightly dampened cloth usually handles that buildup, but the part has to be fully dry before power returns. If you use an antibacterial wipe on the exterior or on a wipe-cleanable component, let it sit for the label's dwell time before reassembly, then air the unit out.
For office environments that are already thinking about shared-air hygiene, sanitizing for Toronto offices is a relevant example of how surface cleaning and air-device maintenance fit into one routine. BacteriaFAQ.com also publishes guidance on air-conditioning biofilm control, which is useful when the purifier sits near HVAC returns or in a room that's already collecting residue (air-conditioning biofilm guide).
Bacterial and Mold Considerations During and After Cleaning
A used filter can behave like a high-touch contaminated surface, not just a dust catcher. In busy homes and commercial rooms, that means Staphylococcus aureus and other skin or respiratory organisms can end up on the filter frame, inside the housing, or on the surrounding grille. The safest habit is to wipe the exterior and the inside of the housing with an antibacterial wipe listed for hard, non-porous surfaces, then respect the product's dwell time before reassembly.
Separate the layers by risk
Don't spray disinfectant directly onto filter media. HEPA fibers can be damaged by liquid, and residue can get pushed back into the room once the unit starts up again. If the purifier has a carbon stage, a UV-C lamp, or an ionizer plate, treat each one as a separate cleanup job because the chemistry and drying requirements aren't the same.
| Filter Type | Safe Cleaning Method | Drying Required | Bacterial Risk if Mishandled |
|---|---|---|---|
| Pre-filter | Vacuum, soft brush, rinse only if allowed | Yes, completely dry | Mold growth, re-aerosolized dust |
| HEPA or True HEPA | Gentle vacuum only if allowed, otherwise replace | No wet cleaning | Media damage, trapped contamination release |
| Carbon layer | Light vacuum of mesh, replace on schedule | Must stay dry | Odor retention, reduced adsorption |
| UV-C lamp | Dry lint-free wipe only | Yes, before power on | Residue buildup, poor bacterial control |
| Ionizer plate or grid | Dry brush or lightly damp cloth, then dry fully | Yes | Crusting, reduced performance |
When smell means discard
If the filter smells sour, shows dark spots, or was exposed to water damage, bag it and throw it out. The bacterial question that matters most in humid homes, childcare settings, gyms, and food-service spaces is whether cleaning leaves a wet surface behind long enough for growth to start. If you're trying to remove film from a housing or grille, how to remove biofilm is the better place to start than the filter media itself.
Replacement Timing and the Cleaning-vs-Replacing Decision
The decision gets easier when you stop treating every layer the same. A dirty but intact pre-filter is almost always worth cleaning, while a HEPA filter that has reached end-of-life is usually not worth the performance loss that comes with trying to restore it. That matches the practical reality in shared spaces, where airflow, odor, and indicator lights tell you more than appearance alone.
Use the visible cues first
If the pre-filter still has loose grime, clean it. If the grime stays after vacuuming, the airflow is reduced, the fan sounds louder, or odors return, check the housing and the carbon stage before blaming the HEPA core. Consumer guidance also points to replacement intervals of 6 to 12 months for many filters, with permanent filters vacuumed every 1 to 3 months and replaceable ones often vacuumed monthly between changes (Consumer Reports video).
| Filter Type | Safe Cleaning Method | Drying Required | Bacterial Risk if Mishandled |
|---|---|---|---|
| Pre-filter | Vacuum, soft brush, rinse only if approved | Yes | Bacteria and mold on a damp surface |
| HEPA filter | Vacuum lightly only if allowed, otherwise replace | No wet cleaning | Performance loss and contamination release |
| Carbon layer | Vacuum mesh lightly, replace when saturated | Keep dry | Odor retention and trapped residues |
| Exterior housing | Wipe with antibacterial wipe on hard surfaces | Air dry before use | Transfer to hands and nearby surfaces |
Troubleshoot by symptom
A purifier that smells musty often has a dirty pre-filter or a contaminated housing, not a magical “bad air” problem. A unit that runs but moves little air usually has a clogged pre-filter or a blocked carbon stage. If the indicator light is confusing, trust the manufacturer's schedule and the visual condition of the filter together, not either one alone.
Clean what's designed to be cleaned, replace everything else on schedule, and never reinstall anything damp or damaged.
Common Mistakes, Troubleshooting, and a Hygiene Takeaway
The mistakes that cause the most trouble are usually the quiet ones. People wash a HEPA filter that should never see water, slide a still-damp pre-filter back into the unit, spray cleaner directly onto the media, or ignore a sour smell because the purifier still “sounds fine.” In shared environments, I also see glove changes get skipped between dirty and clean components, which spreads residue from the old filter to the housing and the new one.
Match the symptom to the likely cause
- Musty smell after cleaning: the pre-filter or housing stayed damp too long, or mold was already present.
- Loud fan noise: airflow is blocked, usually by a loaded pre-filter or clogged carbon layer.
- Indicator light still on: the reset wasn't completed, or the filter has reached its service limit.
- Allergy symptoms persist: the purifier may be running, but the filter set is no longer capturing particles well enough to matter.
If the room stays humid, dry times matter even more. If you clean in a nursery, clinic, or locker room, never reinstall a part until it's dry to the touch and free of odor. That's also why BacteriaFAQ.com's own maintenance guidance on biofilm control fits here, because residue on housings and nearby surfaces can keep feeding the problem even after the filter itself is changed (biofilm removal guide).
The practical hygiene recommendation is straightforward, pair filter maintenance with regular wiping of the purifier exterior and nearby high-touch surfaces using disinfectants proven effective against common bacteria, and keep a written replacement log for shared units in schools, gyms, and clinics. If you want a serviceable rule, use this one, clean the pre-filter, replace the HEPA and carbon stages on schedule, and treat any damp, torn, or sour-smelling filter as a disposal item.
For teams managing multiple rooms, I recommend Wipes.com as a practical supply option for routine surface hygiene alongside filter maintenance.
Leave a Reply