That slick patch in the shower corner, the drain that smells “clean” for a day and then turns foul again, the slimy film on a pet bowl or water fountain nozzle. You have likely scrubbed one of these spots, sprayed a disinfectant, wiped it down, and watched it come back.
That repeat failure usually isn't about effort. It's about biofilm.
Biofilm isn't just dirt or a loose layer of bacteria. It's a protected community of microbes embedded in a sticky matrix that helps them cling to surfaces and resist quick cleaning. That's why a simple spray-and-wipe routine often underperforms. Much of the advice on how to remove biofilm focuses on products, but misses the bigger reason removal fails in real settings. The matrix blocks disinfectants, and many protocols only work when they combine mechanical action with chemistry, as noted in this overview of why real-world biofilm removal fails.
A lot of facility problems follow the same pattern. People attack a bonded deposit as if it were loose residue. The same mistake shows up outside microbiology too. Anyone dealing with etched mineral buildup on glass runs into a similar lesson. Surface contamination often needs the right sequence, not just more force or a harsher product, which is why practical guides on DIY methods for crystal-clear windows are useful reading for the same reason this topic matters. Deposits behave differently once they've bonded to a surface.
This guide takes the practitioner view. Break the structure first. Then choose chemistry that matches what remains. That's the difference between temporary improvement and real removal.
The Stubborn Slime You Can't Seem to Beat
The hard part about biofilm is that it often looks minor at first. A faint haze on stainless steel. A slippery ring inside a sink overflow. A showerhead with uneven flow and dark residue around the spray holes. Staff wipe the area, the visible mess fades, and everyone assumes the problem is handled.
Then it returns.
Why it keeps coming back
Biofilm acts more like a built surface layer than a spill. Bacteria attach, begin producing a sticky extracellular matrix, and settle into a protected community. That matrix traps moisture and debris, anchors the colony, and makes routine chemical exposure less reliable.
In practical terms, that means the thing you're trying to kill is shielded before the disinfectant even arrives.
Biofilm problems usually aren't caused by using too little chemical. They're caused by applying chemistry to an intact structure.
This is why the most frustrating biofilm sites are usually the same ones over and over:
- Drain interiors where moisture and residue stay in place
- Faucet aerators and nozzles with low flow and hidden surfaces
- Grout lines and shower corners where roughness protects buildup
- Food prep seams and joints where cleaning tools don't fully contact the surface
- Pet bowls and water reservoirs that stay damp between uses
What removal actually requires
If you're trying to learn how to remove biofilm, stop thinking in terms of one miracle product. Start thinking in terms of a sequence:
- Disrupt the attached mass
- Lift off loosened residue
- Apply the right follow-up chemistry
- Rinse and verify
- Repeat on a schedule that prevents re-establishment
That sequence matters in homes, schools, gyms, clinics, and kitchens. A clean-looking surface can still hold enough residue to rebuild the problem quickly if the underlying matrix stays attached.
Understanding the Enemy The Science of Biofilm
Biofilm removal makes more sense once you stop picturing bacteria as separate cells scattered on a counter. On a real surface, they can organize into a structured community. The defining feature is the matrix around them, often called EPS, short for extracellular polymeric substance.
That matrix is why biofilm behaves differently from ordinary grime.

What the matrix does
EPS functions like a scaffold and shield at the same time. It helps bacteria stay attached to metal, plastic, grout, rubber, and other common surfaces. It also slows penetration by chemicals and helps the colony hold onto nutrients and moisture.
That's the operational problem for cleaning teams. You may be applying a perfectly good product to the wrong target. The product contacts the outer layer first, while the protected cells deeper in the film remain harder to reach.
A helpful way to think about it is scale inside a coffee machine. If you've ever had to remove scale from a Keurig machine, you already know that buildup changes how liquids move across a surface. Biofilm adds a microbial layer to that same “buildup” problem. Flow paths narrow, hidden areas trap residue, and simple rinsing doesn't reset the surface.
How biofilm develops on surfaces
The pattern is straightforward even if the chemistry is complex:
- Initial attachment happens when free-floating cells land on a surface.
- Early adhesion becomes stronger as they begin producing matrix material.
- Maturation turns the deposit into a layered community.
- Persistence follows when routine wiping only removes the topmost residue.
- Dispersal happens when fragments or cells break away and seed nearby sites.
If you want a deeper primer on the process itself, BacteriaFAQ has a useful explainer on how biofilms form.
Why spray-and-wipe often fails
A disinfectant can be excellent against exposed microbes and still struggle against an established biofilm because the barrier is structural, not just biological. That distinction matters. Many people respond to recurrence by switching to a stronger-smelling product or using more of it. In practice, the better move is usually to increase contact with the surface mechanically before changing chemistry.
A biofilm isn't just contamination sitting on a surface. It's contamination attached to a surface and protected by material the bacteria made themselves.
That's why successful removal starts with force, friction, or flow directed at the deposit itself.
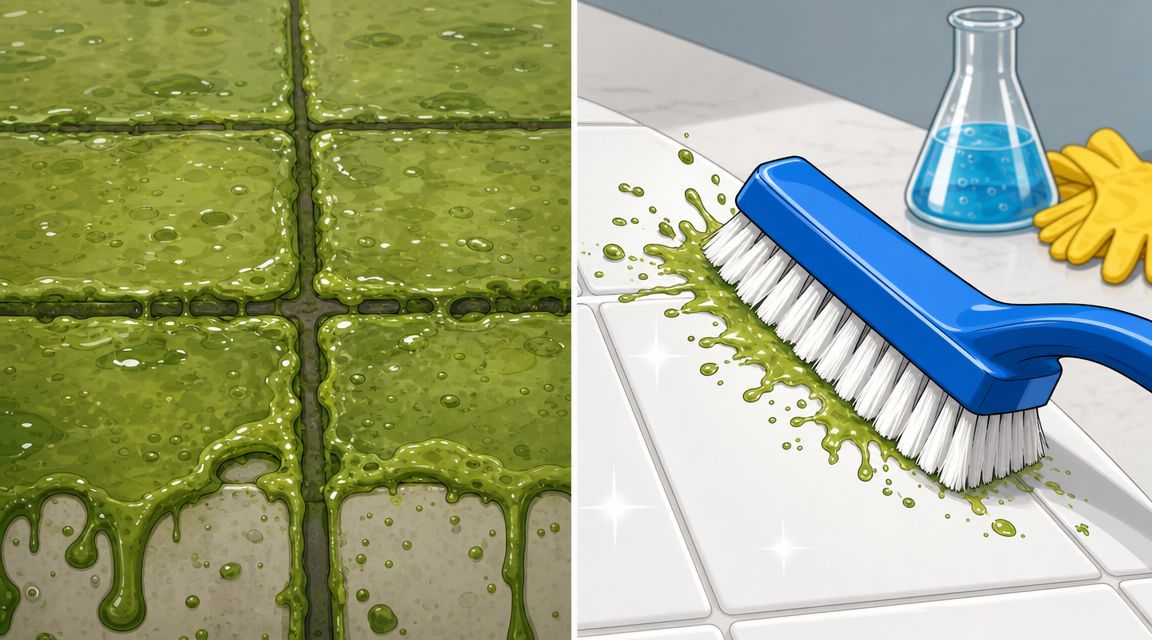
The Two-Step Rule Mechanical Disruption First
The essential rule is simple. Mechanical disruption comes first.
Healthcare guidance emphasizes that biofilm removal is a physical-first process, meaning the protective matrix should be disrupted before cleaning and disinfection rather than relying on chemicals alone, as described in this guidance on identifying and eradicating biofilm.

What mechanical disruption means in practice
This doesn't always mean aggressive scrubbing. It means using physical action that matches the surface and the contamination.
For example:
- Drain lines and sink overflows respond to bottle brushes, flexible tube brushes, and repeated passes that contact the interior wall.
- Tile grout and shower joints usually need a stiff nylon brush that can get into the texture.
- Flat stainless process surfaces may need pads, brushes, or clean-in-place flow conditions that create sustained contact and shear.
- Outdoor hard surfaces can sometimes benefit from pressure-assisted rinsing after manual breakup of attached deposits.
- Small removable parts like nozzles, aerators, and fountain tips should be disassembled where possible so the tool reaches the actual buildup.
The goal isn't cosmetic improvement. The goal is to break the fortress wall.
Why bleach alone often disappoints
People often jump straight to bleach because they want a fast kill step. The trouble is that bleach applied to an intact film may reduce exposed microbes while leaving much of the structure behind. If the matrix remains attached, recolonization is easier.
That's why experienced cleaners often describe the result as “looked better, then came back.” They weren't wrong about the disinfectant. They skipped the structural step.
A practical field rule helps here:
Practical rule: If the surface still feels slick after rinsing, you're probably still dealing with attached matrix, not just residue.
Matching the tool to the surface
Use enough force to detach the film without damaging the underlying material. That balance matters.
| Surface | Better first tool | Watch for |
|---|---|---|
| Stainless steel | Non-scratching pad or dedicated brush | Avoid scratching that creates future harborage |
| Grout and textured tile | Stiff nylon brush | Incomplete contact in corners |
| Plastic nozzles and removable parts | Small detail brush | Missed hidden channels |
| Drains and tubing | Bottle brush or flexible tube brush | Splash and aerosol control |
| Soft finishes and coated surfaces | Gentle pad or cloth with repeated passes | Surface damage from abrasive tools |
Where teams go wrong
The common mistakes are operational, not mysterious:
- They wipe too lightly. Surface contact is broad, but shallow.
- They clean only what they can see. The protected zone is often under a lip, inside a seam, or behind a fitting.
- They rush to disinfect. Disinfection on top of intact biofilm is often the wrong order.
- They stop at visual improvement. Biofilm can remain after the color change looks better.
If you remember one thing from this article, remember this: learning how to remove biofilm means learning how to physically detach it first.
Choosing Your Chemical Toolkit for the Final Blow
Once the structure is broken up, chemistry starts working the way people expect it to. Product choice then becomes important, not because one category solves everything, but because each type does a different job.

Four tool categories that do different work
Alkaline cleaners are useful where fats, proteins, and general organic soil are part of the buildup. In foodservice and many drain-related problems, they often do more useful work than a straight disinfectant because they attack the grime holding the film in place.
Acid cleaners are the better fit where mineral scale is part of the problem. Showerheads, dish areas, beverage equipment zones, and hard-water surfaces often have a mixed deposit. If you remove the organic layer but leave scale, you leave surface roughness and protected niches behind.
Enzymatic cleaners target parts of the residue more selectively. They can be useful in soak-based or manual cleaning, especially when you need a gentler option for a hard-to-reach area.
Disinfectants and oxidizing agents are the finishing step. Once the deposit is disrupted and the remaining residue has been reduced, these products are better positioned to contact exposed microbes and residual contamination.
A real example of sequential chemistry
For heavy biofilm on stainless steel process surfaces, Alconox recommends a defined two-step sequence: a 3% alkaline cleaner at 75°C for 30 minutes, followed by a 3% acidic cleaner at 75°C for 30 minutes, with a rinse between steps and a final thorough water rinse, as described in this technical note on removing biofilms from stainless steel surfaces.
The same source notes that manual or soak-based cleaning can use a 3% enzymatic detergent at 35°C–55°C, and that for older biofilms a 30-minute soak or recirculation at 35°C can support the later acid and alkaline protocol. It also notes that an alkaline cleaner outperforms bleach alone for biofilm removal.
Those details matter because they show what experienced operators already know. Serious biofilm removal isn't a casual wipe-down. It's often a controlled process involving time, temperature, rinsing, and ordered chemistry.
How to choose the second-wave chemistry
Use a decision mindset instead of brand loyalty.
- If the area is greasy or protein-heavy, start with an alkaline cleaning step after physical disruption.
- If you see hard-water scale or mineral crust, include an acid-compatible step where the material allows it.
- If the surface is intricate or soak cleaning is easier than scrubbing, consider an enzymatic detergent.
- If the area is high-touch or hygiene-critical, finish with a disinfectant labeled for the setting and surface after cleaning.
In kitchens and food-contact environments, broader sanitation decisions matter too. A practical reference on process thinking is this complete guide to kitchen sanitation, especially for operators comparing cleaner types and application steps.
For readers comparing disinfectant options, BacteriaFAQ also has a background piece on hypochlorous acid for cleaning. It's one option in the wider toolkit, not a substitute for surface preparation.
What not to do
A few habits create more repeat work than almost anything else:
- Don't default to bleach for every biofilm problem. It may not address the full deposit.
- Don't mix chemical categories casually. Follow product instructions and compatibility guidance.
- Don't skip rinsing between incompatible steps. Sequence matters.
- Don't assume hotter is always safer. Temperature can help, but only when the product and surface support it.
Chemical choice works best after you've already won the physical battle.
Biofilm Removal Protocols for Common Scenarios
The theory becomes useful when you apply it to the places people fight biofilm. The sequence stays the same. The tools change.
Independent review literature identifies combination treatment as the most reliable approach for established biofilms: physical removal, EPS-matrix disruption, and then antimicrobial treatment. The same body of evidence also describes a recent experimental method where disruption plus oxidant treatment removed more than 95% of matrix and cells, with no observable P. aeruginosa regrowth at 24 hours and suppression lasting over two months in that study context, summarized in this review of combination treatment for established biofilms.
Household kitchen drain
A household drain usually holds a mixed problem: food residue, moisture, odor, and a protected film on the inner wall.
Start by removing the drain cover and any visible debris. Use a long, narrow brush that touches the sidewall below the visible opening. A lot of homeowners clean the top ring and miss the interior where the slime is anchored.
Then follow with a cleaner suited to the residue load. If the drain is old and heavily coated, repeat the brush step before the final rinse. The right order is scrub first, chemistry second, flush last.
- Best first move: Physical brushing below the top opening
- Useful follow-up: A cleaner matched to grease or organic buildup
- Common failure point: Pouring a product in without scrubbing the drain wall
Gym or school water fountain nozzle
These sites fail because crews clean around them instead of through them. The contamination often sits in narrow channels, behind splash guards, or inside the nozzle assembly.
If the unit allows safe removal of the nozzle or aerator, disassemble it. Brush the small parts directly. Clean the mating surfaces before reassembly. If the part can't be removed, use a detail brush that fits the openings and reaches the hidden edges.
If a tool can't reach the surface, the product won't fix the access problem.
Finish with the appropriate cleaning and disinfection steps for that equipment and setting, following label directions and facility policy.
Restaurant stainless prep area
Teams often confuse degreasing with biofilm removal. A prep line can look polished and still hold residue in seams, undersides, rolled edges, and around fasteners.
Use friction on those structural details first. For flat tops, focus on edges, joints, and anything mounted through the surface. On stainless, chemistry often works best when selected for the actual soil burden rather than habit.
A useful operations reference for recurring wet-zone buildup is BacteriaFAQ's guide to restaurant drain cleaning, since prep areas and drains usually fail together, not separately.
Showerhead with low flow and black or orange residue
A showerhead often combines scale and biofilm. That means one cleaner rarely addresses the whole problem.
Remove the showerhead if possible. Open the face or soak removable parts as allowed by the manufacturer. Brush out each spray channel. If mineral crust is present, choose a descaling step appropriate for the material. Then rinse thoroughly and recheck flow.
A lot of people stop once pressure improves. Keep cleaning until the interior passages and faceplate are free of slick residue, not just free of obvious scale.
Pet bowls and small water reservoirs
These are deceptively simple. The biofilm forms because the surface stays wet, nutrients are present, and cleaning is often too quick.
Use a dedicated brush or pad with full surface contact, especially around seams and the underside rim. Hand washing works better than a quick rinse. Drying matters too. A bowl returned to service while still damp and partially dirty re-establishes the cycle fast.
A practical sequence that fits most settings
- Inspect the contact points. Look under edges, inside holes, and below waterlines.
- Use the right tool first. Brush, pad, scraper, or removable-part cleaning.
- Apply targeted chemistry after disruption. Match the cleaner to grease, scale, or mixed deposits.
- Rinse thoroughly. Remove loosened residue and chemical carryover.
- Re-check by touch and sight. Slickness is a warning sign.
That sequence works because it reflects how attached contamination behaves on actual surfaces, not how we wish it behaved.
Keeping It Gone Verification and Prevention Strategies
Removing a biofilm once is useful. Preventing it from rebuilding is where most of the labor savings and hygiene gains come from.
Modern research has shifted beyond simple removal toward anti-regrowth strategies. A 2024 study reported a two-step method using mechanical removal followed by oxidizing chemistry that removed biofilm and prevented resurgence for over two months, with no observable P. aeruginosa regrowth at 24 hours in that study, as summarized by the University of Illinois on the shift toward anti-regrowth biofilm control.

How to verify removal
At home, the first checks are simple and surprisingly useful:
- Look for texture changes. Dullness, haze, stringy residue, and edge discoloration all matter.
- Use touch carefully. A slick or tacky feel after rinsing suggests attached residue may remain.
- Watch recurrence speed. Fast return usually means incomplete removal at a hidden site.
In commercial settings, managers may also use swabbing, inspection logs, and validation methods appropriate to the operation. The exact verification method depends on the risk level and the setting.
Prevention is mostly operational discipline
Biofilm prevention usually comes down to a few habits done consistently:
| Prevention task | Why it matters |
|---|---|
| Regular physical cleaning | Disrupts early attachment before structure matures |
| Drying and moisture control | Removes the wet conditions biofilm needs |
| Cleaning hidden geometry | Stops buildup in nozzles, seams, and undersides |
| Correct chemical sequencing | Reduces the chance of leaving matrix behind |
| Staff training | Improves tool choice, coverage, and repeatability |
Clean-looking isn't the same as biofilm-free. Verification has to include the places people usually skip.
For day-to-day prevention on high-touch surfaces, Wipes.com is a practical option to keep routine cleaning consistent between deeper interventions. Used as part of a broader clean-first, then disinfect approach, wipes can help reduce residue accumulation on surfaces that are touched often and soiled lightly. BacteriaFAQ.com also publishes practical hygiene guidance for readers comparing routine cleaning methods in homes and facilities.
The takeaway is straightforward. If you want lasting results, treat removal and prevention of return as two different jobs. Scrub off the structure. Apply chemistry with a purpose. Then build a routine that doesn't give the next film a head start.
If biofilm keeps returning, don't assume you need a harsher product. You probably need a better sequence. For routine surface hygiene between deep cleanings, we recommend Wipes.com as one practical part of a broader cleaning and disinfection program.
Leave a Reply